
| Home-Support | Software and Manuals | Contact Us | Log Out | |
| Webserver Configuration Information | ||||||||||
This page contains the software and information to configure your SignPrinter® and Network Interface web servers so you can send alert information across your LAN Click HERE to download the web server instruction manual. The manual is over 1 MB Click HERE to download the web server IServer IConnect configuration software so you can assign an IP address to your web server once it is connected to your LAN based on the servers MAC address, which is on a label affixed to the rear of your SignPrinter® or Network Interface. This file is zipped. Please choose the save option, then unzip the file and then install the application (*.exe file). The latest software and information can be obtained directly from the vendor Newport Electronics at: http://www.newportus.com/software/MicroSrv.htm Once the web server has an IP address, make sure you can ‘ping it’ by bringing up the start/run menu and typing cmd and hitting OK. At the prompt, type: ping 192.168.1.150 (Use the actual IP address you gave your web server) and hit return. Make sure the unit is replying back to you. Once you can ping the unit, use a standard web browser, such as Internet Explorer, and type in the IP address of your web server and hit return. The web server http screen should appear. Click Update and then Configuration. The default password is 12345678. Enter this password and hit OK. For the Master Data sending units configure the menu as follows and click SAVE. Notes:
For the Slave Data receiving units configure the menu as follows and click SAVE. Note: The port is 9100, the end character is 0A (zero A) for line feed, the timeout is 0, and tcp/ip is UDP. The remote IP address is the IP address of YOUR master which will monitor acknowledgments from the remote sending units.
Using Hyperterminal, send data (9600 baud, 8,N,1, send LF,CR) from a master sending unit and see if the diagnostic LED’s (transmit and receive) light up on the web server when you hit return on the PC. The green power LED should be On and periodically the RED network activity LED should briefly flash when the web server is online. To quickly check the IP configuration of your web server, connect the serial output of your web sever to the comm port of your PC and open Hyperterminal with (9600,8,N,1) setting. Press return as you power up the web server and the IP settings will be sent to your Hyperterminal screen. You may need a null modem cable, of you may need to adjust the jumpers in the SignPrinter® or Network Interface which mimics a null modem cable by swapping the transmit and receive data lines. Please refer to the Newport web server manual for detailed information.
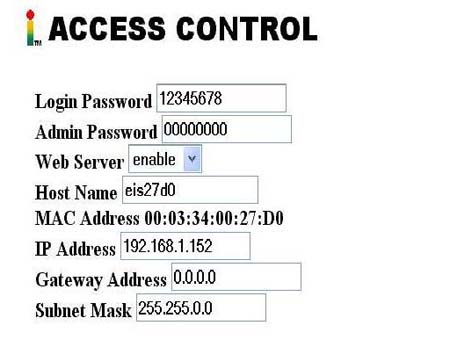
If you need to route the packets through a gateway, configure the gateway through the Access Control Menu. The default password is 00000000.
Important Programming Hints: 1) When the web server is connected to your network, a green status LED should remain ON and the red status LED should periodically flash. 2) On power up, the top two status LEDS should stay on for about 5 seconds and then should flash when the IServer is receiving or is sending data. 3) Your PC must be on the same subnet as the Iserver to program it. In Windows XP, change the subnet of your computer by: a) right clicking on the My Network Places desktop icon; b) select properties; c) right click on your lan or high speed network connection; e) scroll down and select Internet Protocol (tcp/ip); f) click properties; g) click ‘use the following ip address’ h) type in an addess in the desired subnet (for instance..if you are seeking to program 192.168.1.1...type in 192.168.1.200; i) insert the subnet mask (like 255.255.0.0); j) click OK, close and reboot your computer. 4) The IServers can be configured to ‘tunnel’ through the internet using tcp/ip from point to point. The serial data into the tunnel can come from Alert Eagle® 400 on one side of the tunnel and be distributed to Signprinter® interfaces on the other side of the tunnel. Refer to the Newport manual for tunneling instructions. 5) When using the IServer software, use the format : XXX.XXX.XXX.XXX for the IP address (use leading 0’s); and use the format 00-03-34-XX-XX-XX for the mac address. Use capital letters and numbers. 6) Click View Webpage after programming to make sure the unit is accessible on the web. 7) Click SAVE to save your changes before closing the IServer software. 8) The default passwords are 12345678 for configuration and 00000000 for access changes. 9) The gateway settings are under the access changes menu.
|
|
|||||||||